Your Predator 212 is not giving a spark due to a faulty spark plug, a faulty oil sensor or a bad ignition coil kit. A faulty kill switch or a clogged-up carburettor can also be causing this issue. You can fix the issue by replacing the spark plug, disconnecting the oil sensor or changing the ignition coil kit. You can also disconnect the kill switch and clean the carburettor to try and solve the problem
Still confused about the cause of Predator 212 no spark? Read this article to find out more.
Key Takeaways
- Why is the Predator 212 not sparking?
- How to replace a Predator 212 ignition coil kit.
- How to replace a Predator 212 spark plug
- How to bypass the oil sensor and the kill switch of a Predator 212 engine.
Why is My Predator 212 Engine Not Giving A Spark?
Your Predator 212 engine is not giving a spark due to 5 potential reasons. These reasons have been described below.
Reason 1: A Faulty Spark Plug
Having a bad spark plug can cause the lack of sparking. Spark plugs can go bad over time. They can also accumulate carbon deposits due to repeated use.
Materials Needed:
- A socket set.
- A new spark plug. You need an appropriate spark plug for the Predator 212.
Solution: Reinstall a New Spark Plug
- Find the spark plug positioned just above the valve cover and situated beneath the air filter assembly.
- Detach the spark plug boot.
- Utilize a suitable socket to loosen the spark plug by turning it counterclockwise.
- Extract the old spark plug and substitute it with a new one.
- Using the same socket, tighten the spark plug by turning it clockwise.
- Reinstall the spark plug boot.
If you are getting sparks from the spark plug now, that means you had a faulty spark plug.
Reason 2: A Faulty Oil Sensor
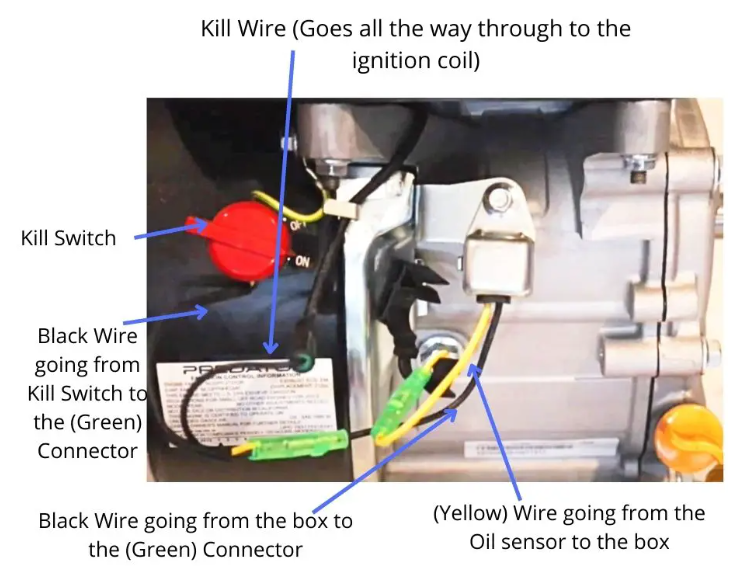
Your predator 212 has an oil sensor connected to a kill switch. If the oil level is low the sensor automatically kills the engine to prevent damage. But if the oil sensor is faulty, it can prevent the spark plug from sparking.
You may have a bad oil sensor that is causing the issue. To both diagnose and solve the issue, follow this process:
Solution: Disconnect The Oil Sensor
- Ensure that you have adequate fuel in your engine.
- Locate the yellow wire that connects the kill switch to the oil sensor as shown in the picture:

- Then disconnect the black wire that goes to the kill switch. Alternatively, disconnect the yellow wire that goes to the box.
- Start the engine.
If the engine starts then you have a faulty oil sensor. Keeping the sensor disconnected will fix the issue. However, you will need to check your engine from time to time to avoid running the engine on low fuel.
Reason 3: A Faulty Ignition Coil or Spark Plug Boot
A bad ignition coil kit can prevent your spark plug from making sparks. If the kit is faulty, you will need to replace the coil kit entirely.
To check if you have a faulty ignition coil or a bad spark plug boot, follow this process:
Materials Needed:
- A socket set
- A new ignition coil kit
- A business card
Solution: Replace The Ignition Coil Kit
- Disconnect the yellow wire that connects the kill switch to the oil sensor inside the engine. Use a socket to unscrew the 4 screws that hold the flywheel cover.
- Remove the flywheel cover.
- Disconnect the kill switch from the ignition coil using a plier and disconnect the spark plug boot from the spark plug.
- Remove the screws that hold the ignition coil in place and then remove the ignition coil kit. Connect the spark plug boot of a new ignition coil kit with the spark plug.
- Lightly screw the two screws of the ignition coil in place and put a business card between the flywheel and the ignition coil.
- Rotate the flywheel so that the card fits snugly between the coil and the flywheel. Fully screw in the two screws of the ignition coil. After that remove the business card.
- Connect the black wire from the kill switch to the ignition coil. Connect the spark plug boot to the spark plug..Ensure that no wire is tangled with the flywheel. Put back in the flywheel cover.
- Screw in the 4 screws to the flywheel cover and reconnect the oil sensor wire and the kill switch wire.
- Start the engine.
If your engine starts, then the problem was with the ignition coil kit. You may want to modify your Predator 212 for some extra power. You can do that by adjusting the governor of the Predator 212.
Reason 4: A Faulty Kill Switch
A faulty kill switch can also cause the no sparking issue in your Predator 212 engine. Replacing the kill switch will fix this issue.
Solution: Disconnect The Kill Switch
- Disconnect the black wire that connects the kill switch to the engine.
- Then start the engine. If the engine starts, then you have an issue with the kill switch. To replace the kill switch of the Predator 212, follow the steps laid out in this short video:
If your Predator 212 still does not work, you may want to switch to a better engine. Predator 301cc compared to the Predator 212cc is a more powerful engine.
Reason – 5: A Clogged Up Carburetor
If you have a clogged-up carburetor that could be the cause of your Predator 212 not starting. In that case, you will need to clean the carburetor.
Diagnosis:
To check if a clogged up carburetor is the cause of your issue, follow these steps:
- Uncover the air box.
- Apply some starter fluid or carburetor cleaner directly into the air filter.
- Attempt a pull start.
If the engine starts, that means the carburetor has gotten clogged and you need to unclog it.
Solution: Clean The Carburetor
To fix the clogged-up carburetor, follow these steps:
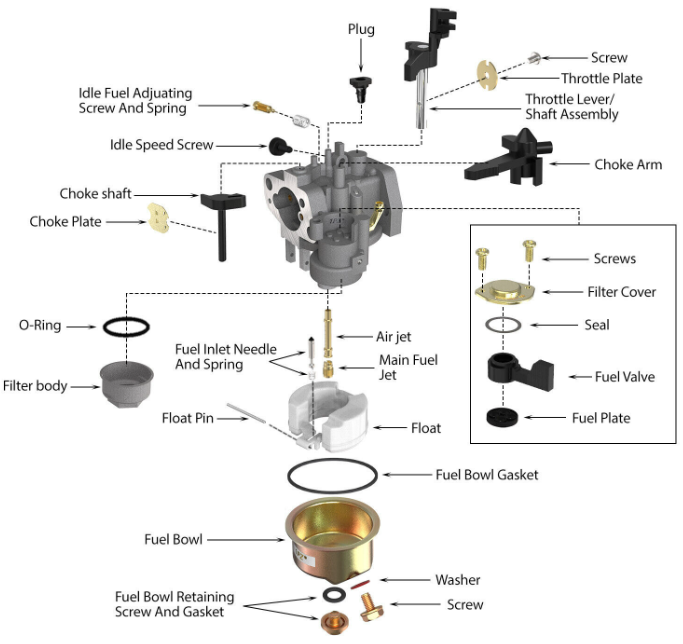
- Start by removing the air filter. Use a 10 mm socket to unbolt the two bolts on the air filter box. Once the bolts are out, disconnect the air filter box from the two hose lines and pull the box out. With the airbox removed, you’ll have access to the carburetor.
- Use pliers to release the fuel line clamp as shown here:

- Disconnect the fuel line and block the hose to prevent fuel from leaking.
- Gently move the carburetor forward to loosen the spring and rod tension.
- Unhook the spring and the rod.

- Use a socket to unbolt the main bolt, which will cause fuel to come out from the bowl. Place a container underneath to collect the fuel.
- Unscrew the idle screw completely.
- Use a flat head screwdriver to remove the pilot jet.
- Take out the main jet using a flat head screwdriver. There’s also an emulsion tube under the main jet, which can be cleaned along with the jets, though it’s not mandatory.
- Use a carburetor cleaner and blow it through the holes of the main jet and pilot jet several times. If you notice debris, use a thin wire to clean the holes thoroughly.
By following these steps, you will most likely resolve your carburetor issues. In most cases the problem is simply due to the jets getting clogged from fuel sitting in the engine for an extended period.
If the engine belongs to an old chassis you may want to identify it. Identifying a vintage go-kart chassis is not as difficult as you may be thinking!
Frequently Asked Questions (FAQs):
Which engine is used in go-kart?
Small two-stroke and four-stroke internal combustion engines for motorized racing are used in go-karts. These engines transfer power to the rear axle through a chain (in some rental go-karts, a belt may be used instead).
How many cc is a go-kart?
A go-kart is 50 cc to 250 cc. The majority of adult go-karts you’ll find are equipped with a four-stroke petrol engine, similar to the ones used in cars, with an approximate capacity of 200cc. On the other hand, karts for children are fitted with a smaller 120cc engine.
Do karts have gears?
Yes, all karts have gears. Every go-kart incorporates gears, but the type of transmission determines how they function. Go-karts with automatic transmissions change gears based on the engine’s RPM, while in manual transmissions, the racer is responsible for shifting gears.
Conclusion
So, now you know all there is to know about Predator 212 no spark. Predator 212 are great engines that are also very affordable. But they need to be maintained regularly to keep them functional.
That is all for today.